


A gate valve serves as a crucial workhorse in countless fluid control systems, from municipal water mains to complex industrial processing lines. Its simple, effective design allows for full, unobstructed flow when open and is intended for complete isolation when closed. However, when one of these critical components begins to fail—leaking, seizing, or failing to shut off completely—the consequences can be severe. Unplanned downtime, property damage from leaks, and safety hazards from uncontrolled pressure are significant risks. This leaves maintenance professionals and facility managers facing a critical decision: is a quick fix a smart, economical solution, or just a temporary patch postponing an inevitable replacement? This guide will help you navigate the "fix vs. replace" dilemma by providing a clear framework for diagnosing failures, executing repairs, and making informed replacement decisions.
Diagnosis First: Distinguish between external leaks (packing gland) and internal bypass (seat failure) before disassembly.
Repair Feasibility: Most stem leaks are fixable with basic tools, but seat erosion often necessitates a full valve replacement.
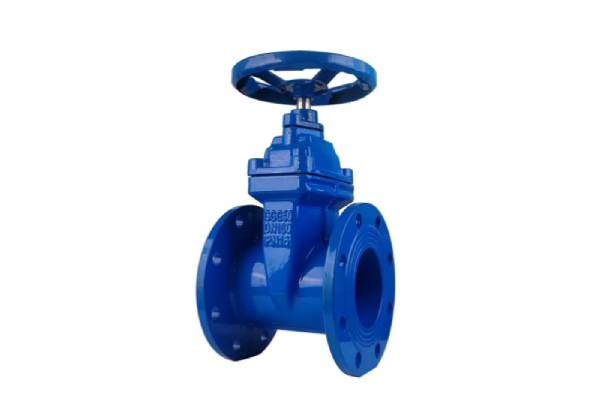
Material Matters: For water distribution, ensure replacements meet NPT-End thread standards for leak-proof integration.
Modern Alternatives: Consider the transition to ball valves for residential shut-off or adjustable knife gate valves for industrial slurry applications.
Effective troubleshooting begins with an accurate diagnosis. Before you reach for a wrench, you must understand precisely what is wrong with the valve. A misdiagnosis can lead to wasted time, unnecessary system shutdowns, and repairs that fail to solve the underlying problem. Most gate valve failures fall into a few common categories.
Not all leaks are created equal. Where the fluid is escaping tells you a great deal about the cause and the likely solution.
External Leak (Packing Nut): This is the most common and often the easiest issue to fix. You will see a slow drip or weeping from where the valve stem enters the main body (the bonnet). This indicates that the packing material inside the packing nut has worn out or compressed over time, losing its seal around the rotating stem.
Internal Leak (Valve Seat): This is a more serious failure. The valve appears to be fully closed, but fluid continues to flow downstream. You can detect this by checking fixtures or pressure gauges on the other side of the valve. This means the gate (or wedge) is no longer creating a tight seal against the internal seats, often due to erosion, corrosion, or trapped debris.
A valve that refuses to turn or only turns with extreme force is a frequent problem, especially in older systems. The primary causes include:
Mineral Buildup: In hard water systems, calcite and other minerals can precipitate out and solidify within the valve body and around the stem threads, effectively cementing it in place.
Corrosion: Rust or other forms of corrosion can seize the stem threads, the gate guides, or the contact point between the gate and the valve body.
Over-Torquing: Forcing a valve closed too tightly can damage the stem, wedge it into the seat, or strip the threads, making it impossible to operate. This is a common mistake made when trying to stop a seat leak.
The environment and media flowing through the valve heavily influence how it fails. Understanding the different gate valve uses helps predict common problems. In municipal water distribution, mineral scale and sediment are the primary culprits behind seized stems and incomplete closure. In industrial processing, however, you might face aggressive chemical corrosion that eats away at the valve seats or abrasive slurries that physically erode the gate and body over time.
Finally, you need to define what a "successful fix" looks like for your specific application. Is stopping a minor, visible drip from the packing nut good enough? Or does your process require a bubble-tight shut-off with zero downstream leakage for safety reasons? Establishing this criterion upfront prevents you from spending hours on a gate valve repair that doesn't meet the system's operational requirements, forcing you to replace it anyway.
Once you've diagnosed the issue, you can proceed with the repair. While a simple packing adjustment can sometimes be done on a live system, any internal work requires a full shutdown and strict adherence to safety protocols.
Never attempt to disassemble a valve under pressure. The risk of injury from high-pressure fluid release is extreme. Follow these essential safety steps:
Depressurize the System: Isolate the section of pipe containing the valve and fully drain the fluid. Verify that the pressure is at zero.
Lockout/Tagout (LOTO): In industrial settings, apply LOTO procedures to all energy sources (pumps, etc.) that could re-pressurize the line. This prevents accidental startup while you are working.
Personal Protective Equipment (PPE): Wear appropriate safety glasses, gloves, and any other PPE required for the fluid in the system.
For a leak around the valve stem, this is your first and simplest line of attack. You can often perform this fix without a full system shutdown if the leak is minor.
Locate the packing nut. It's the larger nut directly below the handle that the stem passes through.
Using two wrenches—one to hold the valve body steady and one for the nut—gently tighten the packing nut about one-eighth to one-quarter of a turn clockwise.
Operate the valve handle back and forth slightly to help the packing material resettle.
Check if the leak has stopped. If not, try another slight turn. Be careful not to overtighten, as this can make the valve extremely difficult to turn or even damage the stem.
If tightening doesn't stop the leak, the packing material needs to be replaced, which requires system depressurization and disassembly.
If the valve is passing fluid when closed or the packing is completely shot, a more involved rebuild is necessary.
Remove the Bonnet: After ensuring the system is safe, unbolt the bonnet (the top part of the valve assembly). You may need to gently tap it with a soft mallet to break the gasket seal. Lift the entire bonnet, stem, and gate assembly out of the valve body.
Inspect the Gate and Seats: Carefully examine the gate's sealing surfaces for pitting, scoring, or embedded debris. Look inside the valve body at the two stationary seats. Are they smooth and clean, or are they eroded and damaged?
Clean Components: Use a wire brush and appropriate solvents to remove all mineral deposits, rust, and scale from the internal body, the gate, and the stem threads. Pay special attention to the bottom of the valve body where sediment often collects, preventing the gate from closing fully.
Lap the Seats (Advanced): If the seats have minor scoring, it is sometimes possible to "lap" them. This involves using a lapping tool with a fine grinding compound to resurface the seats and the gate, restoring a smooth, matching seal. This is a skilled task and is often not cost-effective for smaller, common valves.
Before reassembling, apply an industry-standard, media-compatible lubricant to the stem threads and the packing gland area. This ensures smooth operation and helps prevent future seizing. Reassemble the valve using a new bonnet gasket, tightening the bolts in a star pattern to ensure even pressure. After reassembly and re-pressurization, carefully check for any leaks.
Not every valve is a candidate for repair. A strategic decision requires weighing the cost, risk, and long-term reliability of a repair against the straightforward benefits of a new installation. Using a clear decision framework can save money and prevent future failures.
The initial cost is only part of the equation. Consider the full picture:
Labor vs. Parts: A simple packing replacement might take 30 minutes. A full internal rebuild could take several hours of skilled labor. Compare this labor cost against the gate valve price for a brand-new unit. For many smaller brass or bronze valves, replacement is often cheaper than the labor to repair them.
Downtime Costs: How much does it cost your facility for every hour this line is shut down? A quick replacement might get you back online faster than a complex, uncertain repair.
The condition of the valve body is the most critical factor. No amount of internal part replacement can fix a compromised body.
Wire Drawing: This is a distinct form of erosion caused by high-velocity fluid squeezing through a very small opening (like a barely cracked valve). It cuts fine grooves or channels into the seat and gate material. Once wire drawing has occurred, the valve will never seal properly again and must be replaced.
Pitting and Corrosion: Deep pitting or widespread corrosion on the valve body compromises its structural integrity and sealing surfaces. Repairing is not a viable option.
Evaluate the consequences of a future failure. A repaired valve carries a higher inherent risk than a new one.
Criticality of the Line: If the valve isolates a critical piece of equipment or a hazardous chemical, the reliability of a new valve often outweighs the savings of a repair. The hidden cost of a repaired valve failing unexpectedly can be catastrophic.
Age of the Valve: If the valve is part of an aging system and has already been repaired once, its lifecycle may be over. Proactively replacing it during planned maintenance is smarter than waiting for it to fail again.
| Factor | Favorable for Repair | Favorable for Replacement |
|---|---|---|
| Failure Mode | External packing leak; seized stem due to lack of use. | Internal seat leak; cracked body; severe corrosion. |
| Cost | Labor cost is significantly lower than new valve price (e.g., large, expensive valves). | New valve cost is less than or equal to the cost of repair labor. |
| Valve Condition | Body is in good condition; seats are clean or have only minor blemishes. | Visible wire drawing, pitting, or significant scale buildup. |
| System Criticality | Non-critical line; failure poses low risk. | Critical process; failure would cause significant downtime or safety hazard. |
Sometimes, the best decision is to replace the valve with a different type better suited for the application. If a standard gate valve is constantly failing due to solids or slurry in the line, it is time to upgrade. Moving to an adjustable knife gate valve, which is specifically designed to cut through and seal in such conditions, is a long-term solution, not just a replacement.
When replacement is the chosen path, you have an opportunity to upgrade. The most common debate is the gate valve vs ball valve comparison. While both can provide shut-off, their designs lend them to very different strengths and weaknesses.
For many modern applications, particularly in smaller pipe diameters (under 4 inches), ball valves are now the preferred choice for simple on/off isolation. Their advantages include:
Quick-Acting Shut-Off: A 90-degree turn of the handle moves the valve from fully open to fully closed, providing immediate flow control.
Higher Reliability and Longevity: The wiping action of the ball against the seats helps clear away minor debris, and the seals are generally more durable, leading to a longer service life with fewer leaks.
Compact Design: Ball valves typically have a smaller physical footprint than gate valves of the same size.
Despite the popularity of ball valves, the traditional gate valve remains the superior choice in specific situations:
Preventing Water Hammer: The slow, multi-turn operation of a gate valve gradually stops the flow of fluid. This is crucial in large-diameter water lines, as the rapid closure of a ball valve can create a damaging hydraulic shockwave known as water hammer.
Minimal Pressure Drop: When fully open, a gate valve provides a straight, unobstructed flow path. This results in a very low pressure drop, making it ideal for applications where flow efficiency is critical, such as main water supply lines.
High-Temperature or Slurry Applications: Certain gate valve designs, particularly knife gate valves, are better suited for handling high temperatures and fluids containing suspended solids than standard ball valves.
Your choice should be based on system requirements. Evaluate the flow coefficient (Cv), which measures the valve's efficiency at allowing fluid to pass through. Consider the space constraints of the existing piping; will a long-handled ball valve fit in the available space? Finally, think about the operating requirements—is quick shut-off a benefit or a hazard in your system?
Choosing the right replacement valve is just as important as the decision to replace it. A high-quality, correctly specified valve will provide years of reliable service, while a poor choice will lead to premature failure.
Compatibility is key to a smooth installation. In North America, most residential and commercial plumbing systems use National Pipe Thread (NPT). To ensure a leak-proof seal with existing iron, steel, or copper fittings, selecting an NPT-End Thread Gate Valve for Water Distribution is essential. Using a valve with the wrong thread type (e.g., BSPT) will result in a connection that will never seal properly, no matter how much thread sealant is used.
The valve's material must be compatible with the fluid it will control. Making the right choice prevents corrosion and extends the valve's lifespan.
Brass: A common and cost-effective choice for general-purpose use in water, oil, and air lines. It is not suitable for saltwater or highly corrosive fluids.
Bronze: Offers superior corrosion resistance compared to brass, especially in marine environments or when dealing with slightly more aggressive fluids.
Stainless Steel: The premium choice for excellent resistance to a wide range of chemicals, high temperatures, and corrosion. It is necessary for food processing, pharmaceutical, and chemical applications.
Proper installation ensures the new valve performs as designed and doesn't fail prematurely.
Clean the Threads: Ensure the threads on the existing pipe are clean and undamaged.
Use Proper Sealant: Apply a high-quality pipe thread sealant (paste or PTFE tape) to the male threads of the pipe, leaving the first one or two threads bare to prevent sealant from entering the valve.
Correct Torque: Tighten the valve using a wrench on the valve body's hex flats, not on the main body. Overtightening can distort the valve body and cause the seats to leak. Follow manufacturer torque specifications if available.
Post-Installation Testing: Once installed, slowly re-pressurize the system and carefully inspect the new connections for any leaks. Operate the valve several times to confirm smooth action.
Effectively managing your fluid control systems hinges on a smart approach to valve maintenance. The decision to repair or replace a failing gate valve should not be based on guesswork but on a structured, diagnostic-led process. By first identifying the exact nature of the failure, then weighing the total cost of ownership against operational risk, you can make choices that enhance system reliability and save money in the long run. For aging infrastructure, proactive replacement during planned shutdowns is always preferable to emergency repairs. Ultimately, prioritizing high-quality components and proper installation practices will significantly reduce the frequency of future interventions, ensuring your systems operate safely and efficiently.
A: You can only perform a very limited repair. If the leak is a slow drip from the packing nut around the stem, you can sometimes tighten it slightly (1/8 to 1/4 turn) to stop the leak. However, any repair that involves disassembling the valve, such as replacing the packing or inspecting the gate, requires the system to be fully shut down, depressurized, and drained for safety.
A: The most common reason is sediment or mineral buildup in the bottom of the valve body. Over time, debris can settle into the groove where the gate wedge is supposed to sit, physically preventing it from seating fully. Other causes can include a bent stem or damage to the gate itself. Forcing it closed can cause severe damage.
A: The lifespan varies greatly based on water quality, frequency of use, and valve quality. A good quality brass or bronze gate valve in a clean water system that is operated a few times a year can last 20 years or more. In areas with hard water or if the valve is left untouched for decades, it may seize or fail much sooner.
A: For common residential and commercial sizes (e.g., 1/2" to 2"), ball valves are often comparably priced or slightly less expensive than gate valves of the same material. As the valve size increases for industrial applications, the price differences can vary more significantly based on material, pressure rating, and specific design features.
A: An adjustable knife gate valve is specifically designed for applications involving thick liquids, slurries, or dry solids. Its thin gate (the "knife") can cut through the media to create a seal. Use a knife gate valve in systems like wastewater treatment, pulp and paper, or mining, where a standard wedge gate valve would quickly become clogged and unable to close.


